Audacity Dial Calibration Procedure


General


After finishing a project to buld a simple dial calibration tester, I "discovered" using the Audacity audio program to simply and more accurately test dial frequency and pulse width. With this program all that is needed is the program (free) and a cable with a 1/8-inch plug on the end.

With this procedure you can check the frequency of the dial and the make/break pulse width accuracy.

Make the Cable and Connect It


The cable plug is a 1/8-inch diameter phone plug like the ones used on almost every pair of earphones. I have many of these with the wires connected that are broken or left over from airplane trips, so that is what I used. If you don't have a surplus earphone, you will need to solder one wire to a plug barrel terminal (the ring furthest from the tip) and one wire to the tip terminal. My procedure will assume you are using a cable salvaged from a scrap earphone.

There are two coaxial wires coming from the plug. Use an ohmmeter to find the one connected to the plug tip. Strip the outer insulation off an inch of this wire and snip off the outer shield wires. You will not use the shield on this wire and should insulate the shield wire ends to prevent accidental contact. Strip the insulation off the inner conductor of the tip wire and either tin it, attach a spade terminal, or attach an alligator clip. I like terminals.

Now begin on the second wire from the plug. Strip the outer insulation off an inch of this wire and snip off the inner conductor leaving just enough to insulate it from the shield wires.. You will use the shield on this wire as the second connector; either tin it, attach a spade terminal, or attach an alligator clip.

On a Western Electric dial, connect one terminal of the cable to the Y terminal and one terminal of the cable to the BK terminal.

On an Automatic Electric dial, connect one terminal of the cable to each impulse spring terminal. There are no terminals numbers on an AE dial.

Test

Grab a 10-Pulse Wave
Load Audacity program.

Select microphone

Set for high volume

Connect cable to dial impulse spring terminals: terminals Y and BK in a Western Electric dial, terminals on Automatic Electric dials are not identified. Insert the 1/8-inch plug.

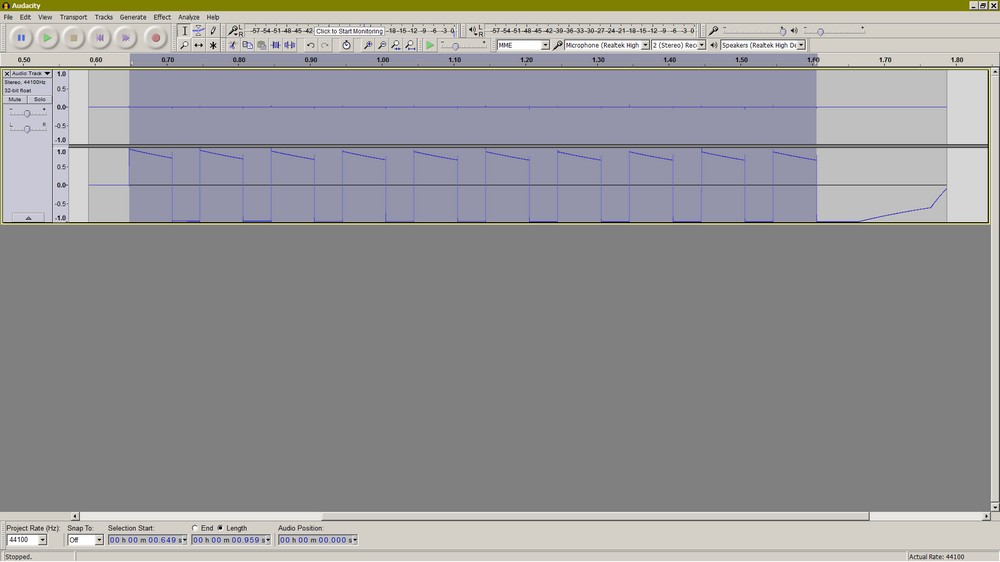
Wind the dial for a number 0 and hold it. Press the Audacity record button and release the dial. Press the Audacity stop button when the dial stops.

Unplug the 1/8-inch plug if a good wave form is shown, or press the in the box to erase the recording, then try recording again.

Use the select button and drag the cursor to select all pulses plus a little more before and after. Press the trim button to delete the wave before and after the selected portion.

Zoom and position the wave using the scroll bar at the bottom of the window.
Check the Dial Frequency
Use the select button and drag the cursor to precisely select only pulses from the starting edge of the first wave to the end edge of the last pulse.

At the bottom of the screen, click the length button and look at the time in the length box .

If 10 pulses are selected and the length is 1.000 second, the dial frequency is perfect. A slow dial wili have a length greater than 1.1 seconds; a fast one less than .09 seconds.

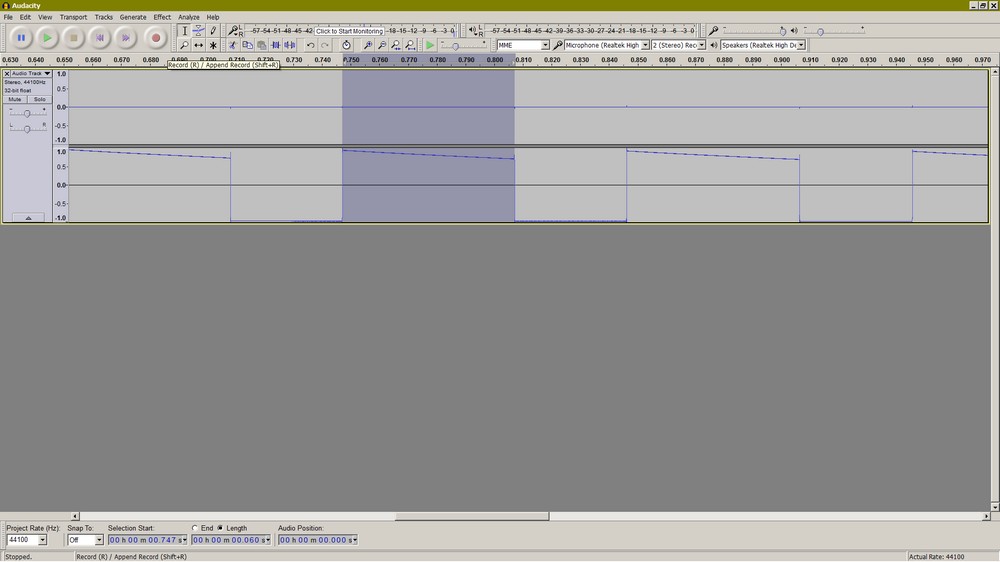
Check the Dial Make/Break Ratio
Zoom the display to get a complete make/break cycle.

Use the select button and drag the cursor to precisely select only one positive break pulse from the starting edge to the end edge.

Look at the time in the length box and write down the time.

Use the select button and drag the cursor to precisely select only one negative make pulse from the starting edge to the end edge.

Look at the time in the length box and write down the time.

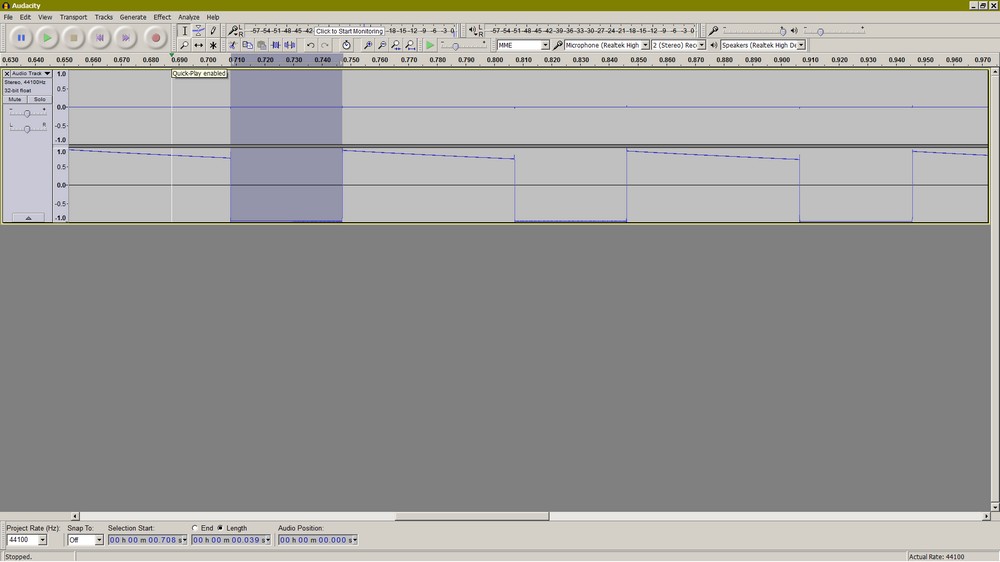
Divide the break pulse time by the sum of both the break pulse time and the make pulse time. For a perfect dial this ratio will be 0.60. The limit is 0.52 to 0.66; but at my house the Verizon Ont likes 0.56, so you may want to set a different target.

Divide the make pulse time by the sum of both the break pulse time and the make pulse time. For a perfect dial this ratio will be 0.40. The limit is 0.34 to 0.48;my target is 0.43.

An example:
break length = 000h00m00.060
make length = 000h00m00.039
break ratio =.060 / .060 + .039 = .060 / .099 = .606 = 60.6%


Screen Shots


Selected 10-Pulse Dial Wave


Selected Break Pulse


Selected Make-Pulse


Copyright Dale Thompson,
20 January 2017 through
last revision on 20 January 2017